QuickBooks Enterprise ODBC Driver: Unlocking the Power of Data

QuickBooks Enterprise is a popular accounting software used by many businesses to manage their financial operations. The QB Enterprise ODBC driver is a tool that enables users to access data from QuickBooks Enterprise using the Open Database Connectivity (ODBC) standard.

In this article, we will provide a comprehensive guide to the QuickBooks Enterprise ODBC driver, including its features, benefits, and how it can be used to improve business processes.

Want your QuickBooks data on the Desktop but not sure how to do it? Worry not! Call on 1888-405-0630 to avail of priority Support.

What is the QuickBooks Enterprise ODBC Driver?

Open Database Connectivity (ODBC) driver is typically a standard application that allows admin access to your company file using third-party applications like Microsoft Excel, Microsoft Access, or Crystal Reports. This driver enables multiple applications to communicate and exchange data with one another.

With the help of ODBC driver, you can smoothly create spreadsheets in Microsoft Excel, tables in Microsoft Access, and generate reports in Crystal Reports that reflect your company file. Moreover, you can use this driver to create your own reports using data from multiple company files, personalize invoices, create mail merges, and much more.

The Importance And Features of Enterprise ODBC Driver Tools

ODBC driver tool enables users to create custom reports along with read-only access to the QuickBooks Database. The data storage is done in its own proprietary DBMS file format. Moreover, QuickBooks Enterprise ODBC Driver also helps developers easily access their data in various applications. To know more about this incredible tool, stay tuned till the end.

Some Key Features of The ODBC driver:

Data Extraction:

The driver enables users to extract data from QuickBooks Enterprise using the ODBC standard. This allows users to access data such as customer information, invoices, and sales data, and use it in other applications.

Real-Time Data Access:

The driver provides real-time access to QuickBooks Enterprise data. This means that any changes made to the data in QuickBooks Enterprise are immediately reflected in other applications that use the driver.

Compatibility:

The driver is compatible with a wide range of applications, including Microsoft Excel, Access, and SQL Server.

Customization:

The driver can be customized to meet specific business requirements. This means that users can choose which data to extract from QuickBooks Enterprise and how it is displayed in other applications.

Minimum System Requirements for QuickBooks Enterprise ODBC Driver

Before installing or configuring QuickBooks Enterprise ODBC Driver, it is recommended to check that your system is meeting up with the requirements stated below:

  • Make sure that your system has MS .Net framework 4.5.
  • ODBC driver for QuickBooks support MS windows 32-bit and 64-bit.
  • Confirm that ODBC or OBCC drivers shouldn’t be installed in your system simultaneously.

Let’s discuss Issues faced by users while Installing the ODBC Driver!

When the users start installing or configuring ODBC Driver, they might get stuck with multiple technical glitches. Let’s figure out what:

  • Wrong permission on database files.
  • Improper connection strings setup.
  • Slow internet connectivity and latency issues.
  • Corrupted or damaged database.
  • Delayed due to service interruptions, resulting in server hardware or software updates.
  • Intentional or unintentional requests for large data amounts.

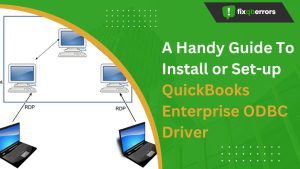
Effective ways to install and set up the Driver!

Are you the one who is unable to answer how I install and set up QuickBooks Enterprise ODBC Driver? It’s alright as below we’ve covered all the steps to download, install and set up ODBC Driver for your QuickBooks account. Let’s check out each one in a given sequence:

How do I install ODBC Drivers?

To install QuickBooks Enterprise ODBC Driver, go through the instructions as follows:

  1. To start off, open the QODBC driver download page under the web browser.
  2. Now, enable the download on-screen permissions to store the self-extracting executable file.
  3. You need to type QODBC.exe into the search bar and then save it in a temporary directory or in the My Documents folder.
  4. After this, extract the installation files from the zip folder where you delivered them.
  5. Before running the QuickBooks ODBC driver installer, make an exit from Microsoft Office. This is because the driver’s installation can be interrupted when MS Office is running in the background.
  6. Next, tap on the Install program from within the Windows.
  7. Choose the location directory where you wish to install the QODBC installation files.
  8. You must press the OK and Finish tab to complete the process.
  9. At last, you’re done with installing the QuickBooks ODBC Driver.

Install QuickBooks Enterprise ODBC Driver Easily

Understand how to set up ODBC Drivers!</b

Perform the below-given steps to configure QuickBooks ODBC Driver. 

  1. Open QBDE and click the File menu option. 
  2. Now, select Utilities and then tap on Configure ODBC.
  3. Hover over the General tab.
    • You need to choose to Use the Company file that’s now open in QuickBooks.
    • Enter the QuickBooks Data under the Data Source Name.
    • Later, select Test Connection to QuickBooks (log in to your company file as an Admin if you want to be able to run the test connection).
    • Once you see Test Connection to QuickBooks Successful, press OK.
    • Afterward, hit the Apply tab to apply these changes.
  1. Navigate to the Messages tab.
    • Unmark the Detail Tracing (Slow) checkbox.
    • Now, select the Display Optimizer Status Panel option.
    • To check the details of what ODBC is working on, click on the Display Driver Status Panel.
    • It will help you to show the number of records processed and the current running activity in ODBC. it also provides you the speed assessment using optimized and non-optimized data, which will let you know if you have to troubleshoot the software performance.
    • Tap on Apply.
  1. Move to the Optimizer tab.
    • Firstly, opt for the Use Optimizer checkbox.
    • The default Optimizer file location is (%AppData%\ODBC Driver for QuickBooks\Optimizer). This is a recommended path to use.
    • You must click on The start of every query and then select Apply. Note: The initial optimization time may vary depending on the file size you’ve and it takes 24 hours to proceed. The more transactions you have, the more time the optimization process will take. Once completed, QuickBooks data connections will run faster.
  1. Finally, tap on OK to exit the Configure ODBC Driver window.

Is QuickBooks ODBC free?

Yes, QuickBooks ODBC offers a FREE QODBC Read-Write trial copy for the software valid for up to 30 days of use. Now QuickBooks Pro Advisors and consultants can set up reports and spreadsheets with live QuickBooks data for their customers, increasing billing hours and much more.

Summing-up!

Still, coming across different unspecified errors while installing and configuring QuickBooks Enterprise ODBC Driver? Don’t panic; here you’ll get the answer to all your queries. Like other QB users, if you’re also unable to export your accounting data from the QuickBooks company file then feel free to have a word with our experts at the toll-free number 1888-405-0630 to tackle all such technical annoyances in one go.

FAQs

Can I install and set up the ODBC driver in QuickBooks Desktop Pro and Premier also?

Yes, of course, you can install, configure and set up ODBC driver in any QuickBooks version and editions including Pro, Premier, or Enterprise. However, the read-only and read-write drivers are present in FLEXquarters. Still, getting issues doing it on your own, immediately get in touch with our QuickBooks helpdesk to get it done with much more ease.

Are QuickBooks users different from ODBC users?

Yes, both QuickBooks and ODBC users are different from each other. ODBC has a separate login from your QuickBooks account so even if you’re an admin then you have to create new user credentials to connect to QuickBooks for Custom Reporting. ODBC users don’t have the same permissions as QuickBooks users. The login information can only be shared with users who have open access to QuickBooks software.

Portable Company File in QuickBooks | The Ultimate Guide

QuickBooks is a popular accounting software used by many businesses for their financial management needs. A portable Company File (PCF) is one of the useful features of QuickBooks. It is a compact file that contains all the financial data of a company, including charts of accounts, transactions, and preferences. In this article, we will discuss how to create, transfer, use, backup, and troubleshoot Portable Company File in QuickBooks.

Creating Portable Company File:

Creating a Portable Company File in QuickBooks is a simple process. To create a Portable Company File, follow these steps:

How to Create Portable Company Files in QuickBooks Desktop

  • Open QuickBooks and go to the File menu.
  • Select Create Copy.
  • Choose Portable Company File and click Next.
  • Select a location in the Portable Company File and click Save.
  • QuickBooks will allow you to set a password for the Portable Company File. Set a password and click OK.

Benefits of creating Portable Company File:

Creating a Portable Company File has several benefits, such as:

  • Easy transfer of data to another computer or QuickBooks version.
  • Reduced file size, making it easy to share.
  • Faster backup and restore process.
  • Improved performance of QuickBooks.

How To Override Portable File Creation Error in QuickBooks?

A portable file creation error in QuickBooks is the error that occurs when a regular user tries to create or open a portable company file with the .qbm extension. When the error occurs, it gives an error message on your screen with the text:

You may not have sufficient permission to create a portable company file from this computer. Please try creating the portable company file from the server: (server__name).

The error message indicates that the error is occurring due to insufficient permission. Data damage can be another possible reason behind the arrival of this error. However, don’t get panic when it occurs, and follow this guide until the end to learn about the troubleshooting steps.

Transferring The Portable Company File:

Transferring Portable Company File is an important aspect of using it. There are several methods of transferring a PC File, such as:

  • USB Drive: Save the PC File to a USB drive and transfer it where you want.
  • Email: Send the Portable Company File as an email attachment to the recipient.
  • Cloud Storage: Save the same File to cloud storage services like Google Drive or Dropbox and share the link with the recipient.

Precautions to take while transferring Portable Company File:

While transferring a Portable Company File, it is essential to take some precautions to avoid any data loss or security breach. Some of the precautions are:

  • Use a secure method of transfer like an encrypted email or a password-protected USB drive.
  • Make sure the recipient has the same QuickBooks version as the sender.
  • Back up the original file before transferring it.

Possible Reasons Behind QuickBooks Portable File Creation Error

Several factors can give rise to the QuickBooks portable file error, and some of the main reasons are stated in the below-given list. Please check:

  • When several workstations in a network are hosting the QuickBooks company file.
  • Incorrect company file name, including the special characters (@, #, $, ! etc.) or space.
  • A damaged or corrupt company file is also one of the main reasons behind this error.
  • When a Window user tries to access the company file with insufficient access permission, an error message appears abruptly on the screen.

How Do I Fix Portable Company File Issues in QuickBooks Desktop?

Knowing the possible reasons behind the portable file creation error is half the job done. Now, you need to suppress these factors for error resolution.

Solution 1: Download QuickBooks Tool Hub and Run Quick Fix my Program

Quick fix my program is an efficient utility that can repair the program issues making it prone to errors. To run it, you need to download and install the QuickBooks Tool Hub in the first place. Below is how you can get this task accomplished: 

  • Leave QuickBooks and visit Intuit’s website using your Internet browser. 
  • Once done, check the latest version of the QuickBooks Tool Hub and install it.
  • Thereafter, open the downloaded file and follow the on-screen instructions to install it. 
  • Moving ahead, agree to the terms and conditions, and the tool hub is now ready to use. 
  • Now from within the QuickBooks Tool Hub, navigate through the list of common issues and select Program Problems. 
  • You may now select the Quick Fix My Program option, and it will detect the resolve the program issues that might be causing the error. 
  • After that, check if the portable file creation error in QuickBooks is resolved or not. 

No luck with this solution? Try the next one to eliminate the portable file error in QuickBooks Desktop.

Solution 2: Make Sure That Your Company File Name Is Correct 

An erroneous company file name is one of the main reasons behind the error, and you need to rectify it in order to conquer the issue. Follow the below-given steps carefully to correct the naming of your company file.

  • Close QuickBooks and move to the folder containing the QuickBooks company file.
  • Next, you need to locate and right-click on the QuickBooks company file.
  • After that, right-click on the file and select Rename from the drop-down menu.
  • This option will allow you to make changes to the file name.
  • Make sure that there are no spaces in the company file name, and remove special characters (if any).

If it doesn’t resolve the error, try the next error resolution method.

Solution 3: Check Your Hosting Configuration Settings

In a hosting network, the server computer hosts the company file, whereas the hosting is disabled on the workstations. To ensure that the workstations are not hosting the company file, follow the below-given steps:

  • Start QuickBooks on a workstation.
  • Next, go to the Files and select the Utility option.
  • Here, if you see the “Stop Hosting Multi-User Mode” option, click on it to stop the file hosting.
  • However, if you see “Host Multi-User Access,” there is no need to take any action.
  • Now, you need to perform the same set of steps on all the workstations to check the hosting settings.

Now, check if the QuickBooks Desktop portable company file issue is fixed or not. If you see the error message again, try the next method.

Solution 4: Repair The Damaged QuickBooks Company File

If you are having trouble creating the portable company file in QuickBooks, repair the damaged data file using Verify and Rebuild Data Utilities.

Verify Data Utility

Verify Data is an excellent utility in the program that can detect data damage and integrity issues in a QuickBooks company file. To run it:

  • Open QuickBooks Desktop and go to File >> Utilities.
  • Here, you have to choose the Verify Data option.
  • Now click the OK button and close all the program windows.
  • Wait for it to verify the data integrity and determine the potential issues.

If no issues are found, there is no need to perform any additional action. Contrarily, if the data integrity is not intact, you need to run the Rebuild Data utility.

Rebuild Data Utility

Rebuild Data Utility is an incredible utility that can rebuild the data damaged in the QuickBooks company file, detected by Verify Data Utility. Below is how you can do it:

  • From within the QuickBooks application, go to the File menu and select Utilities.
  • Next, choose Rebuild Data and click the OK button.
  • QuickBooks will now create a file backup, and you need to choose Local/Online Backup and click the Next button.
  • Moving ahead, select a backup location with the Browse option and click OK.
  • Next, click Use This Location and then Save to backup your company file.
  • Now the utility will start to rebuild the data file.
  • In the end, click Review Now to check the company file rebuild results.

Once again, you will need to run the Verify Data utility to check if the data integrity issues are resolved or not. If the QuickBooks portable file error continues to trouble, go to the next solution.

Solution 5: Verify Windows Folder Permissions To Fix Portable File Error in QuickBooks

Insufficient Windows permissions are also one of the apparent reasons behind the arrival of the portable file creation error in QuickBooks. To check it:

  • Close the QuickBooks Desktop application and go to the folder that stores the company file.
  • Now, right-click on the folder and click Properties from the drop-down list.
  • Moving ahead, click on the Security tab and choose the User among the Group or the user names. 
  • Moving ahead, click the Edit option to change the user permissions.
  • Now, checkmark on Edit to change the user permissions option.
  • Here, check on the Full Control and click Apply.
  • In the end, click OK to conclude the procedure.

Solution 6: Create Another Portable Company File

You may get the portable file creation error in QuickBooks while creating a file manually. In such a case, you can implement the following steps for error resolution:

  • First of all, go to the folder containing the QuickBooks company file and locate the file with extension .qbw. It is your primary QuickBooks company file.
  • Next, right-click on the file and choose Copy option.
  • Thereafter, go to the Windows Desktop and right-click on it and select Paste from the drop-down menu.
  • Now open QuickBooks without opening the company file.
  • Select open or restore an existing file option and also select open a company file option to move ahead.
  • Now open the file you have pasted on the Desktop using the Browse option.
  • Go to the file menu in the open copy of the company file and select create copy option after that.
  • Here, you need to select the restore portable company file and click the Next button.
  • Perform the on-instructions carefully to create another portable company file.

If An Error Occurs When Restoring The Portable Company File

If the error occurs when restoring the portable company file, you may follow the below-given steps:

  • First, locate the portable company file with a .qbm extension from the folder containing the data file.
  • Thereafter, you need to right-click on the file and select the Copy option from the drop-down list.
  • Now go to the Windows Desktop and right-click somewhere to select the Paste option for pasting the file you have copied from within the folder.
  • Launch QuickBooks, but don’t open the company file.
  • Moving ahead, choose to open or restore an existing file.
  • Also, choose the restore a portable file option to move ahead. Browse the system and open the portable file you have copied and pasted to your Windows Desktop.

In this position, if you are able to open the copied portable file from its new location, the error is resolved. You may utilize the move the accounting data option.

Besides, rename the portable file by adding .OLD at the end of the file name (recommended).

To End Things Off!

We hope the portable file creation error in QuickBooks is no more concerning you, as this post elaborates on some of the best troubleshooting solutions for this error. However, if you need further assistance with the error resolution, feel free to reach out to get priority support at Toll-Free Number 1888-405-0630. Our help desk is also available through chat or email channels. Just describe your issue and get one-on-one assistance with the error resolution.